How to Remove Clothes from Image Using AI (Safe & No Nudity)
Editing clothing in photos used to require advanced Photoshop skills. Today, AI tools make the process faster, cleaner, and far more accessible. If you’re searching for how to remove clothes from image using AI in a safe, professional way, this guide walks you through the practical options, best practices, and common pitfalls.
This article focuses on brand-safe AI clothing editing. No nudity. No risky outputs. Just realistic outfit replacement and clean results you can actually use.
- What AI clothing removal really means (and what it doesn’t)
- How modern AI clothing editors work
- Step-by-step workflow you can follow today
- Best use cases for ecommerce, fashion, and marketing
- Common mistakes and a quick checklist
What “Removing Clothes with AI” Actually Means
Despite how the phrase sounds, AI clothing removal is not about generating explicit content. Reputable tools work by detecting garments like jackets, coats, or uniforms and replacing them with neutral outfits, mannequin styles, or alternative clothing.
In practice, learning how to remove clothes from image using AI usually means:
- Removing outerwear to reveal a base outfit
- Swapping one outfit for another
- Standardizing product images for catalogs
- Creating mannequin-style visuals without reshoots
Tools that promise “full removal” or nudity generation are risky, often unreliable, and unsuitable for commercial use. Platforms like Imagens.app are designed specifically to avoid those issues.
How AI Clothing Editors Work Under the Hood
Modern AI clothing editors rely on computer vision and diffusion models. Instead of “erasing” pixels, the system understands the structure of the human body, identifies clothing layers, and regenerates the edited area with realistic fabric, folds, and lighting.
Key technologies involved
- Garment segmentation: Detects jackets, coats, hoodies, or uniforms
- Pose estimation: Preserves body proportions and posture
- Image-to-image generation: Rebuilds the clothing area naturally
This is why results look far more natural than traditional cut-and-paste editing. Adobe explains similar AI image editing principles in its generative fill documentation (https://www.adobe.com/products/photoshop/generative-fill.html).
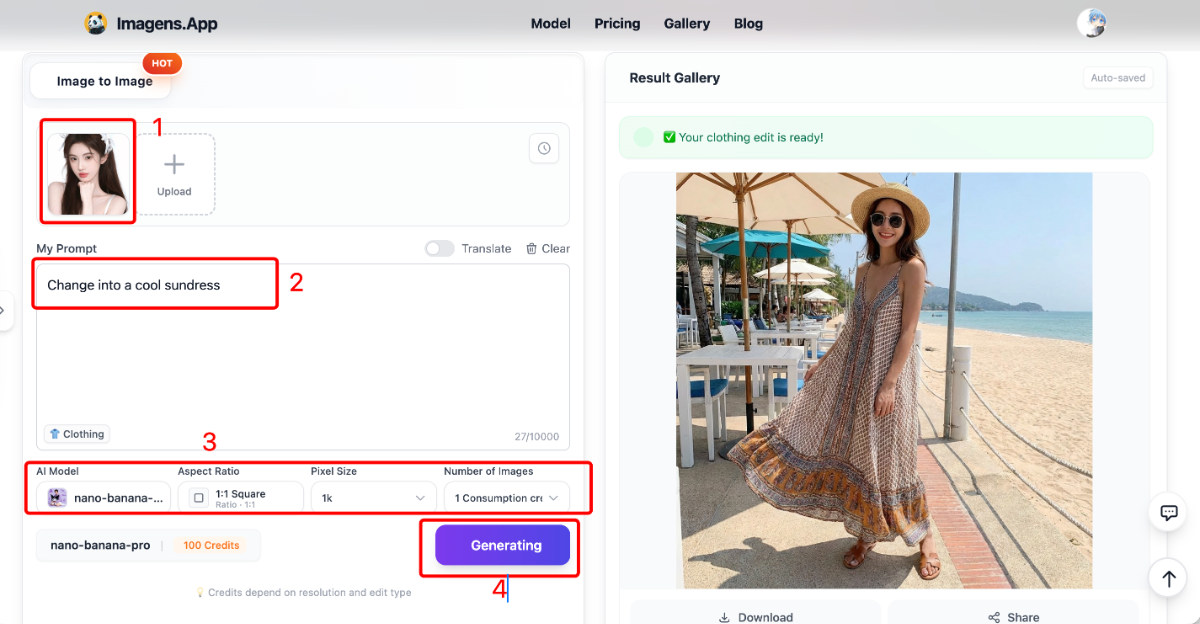
Step-by-Step: How to Remove Clothes from an Image Using AI
The exact interface varies by tool, but the workflow is usually the same. Here’s a practical process you can follow using a safe AI clothing editor.
1. Upload a suitable image
Choose a clear, well-lit photo. Full-body or upper-body images work best. Avoid heavy motion blur or extreme angles.
2. Select the clothing edit mode
Look for options like “outerwear removal,” “outfit swap,” or “mannequin style.” These modes are optimized for realistic results.
3. Add a short, clear prompt
Keep prompts simple. For example:
- “Replace jacket with neutral shirt”
- “Change outfit to simple white top”
Overly detailed prompts often make results worse, not better.
4. Generate and review
Check fabric edges, lighting consistency, and proportions. If something looks off, regenerate or slightly adjust the prompt.
Best Use Cases for AI Clothing Removal
Understanding how to remove clothes from image using AI is especially valuable in professional scenarios where consistency matters.
Ecommerce and marketplaces
Sellers use AI to remove bulky jackets or standardize outfits across product listings. This saves time and avoids expensive reshoots.
Fashion design and lookbooks
Designers can test multiple outfit ideas on the same model image, speeding up concept reviews.
Marketing and ads
Brand-safe visuals are critical for paid ads. AI outfit replacement ensures compliance without manual editing.
| Use Case | AI Clothing Editing Benefit | Risk Level |
|---|---|---|
| Ecommerce catalogs | Clean, consistent product images | Low |
| Fashion mockups | Fast outfit experimentation | Low |
| Social media content | Quick visual variations | Medium |
Common Mistakes to Avoid
- Using low-resolution or blurry images
- Expecting AI to “guess” unseen anatomy
- Overloading prompts with unnecessary detail
- Using unsafe tools for commercial projects
A good rule: if the tool promises shocking results, it’s probably not suitable for real work.
Quick Checklist Before You Generate
- Image is clear and well-lit
- Edit mode is clothing replacement, not removal
- Prompt is short and specific
- Output is fully covered and brand-safe
FAQ: AI Clothing Removal
Is it legal to remove clothes from images using AI?
It depends on consent and usage rights. For commercial projects, always use images you own or have permission to edit.
Does AI clothing removal generate nudity?
Professional tools do not. They replace clothing with safe alternatives and avoid explicit output.
Can I use AI-edited images for ecommerce?
Yes, as long as the platform allows commercial use. Always check the tool’s terms of service.
What image formats work best?
JPG and PNG are the most widely supported. Higher resolution images usually produce better results.
Do I need design skills?
No. Most AI clothing editors are designed for non-designers with simple interfaces.
Where to Try It Safely
If you want a practical, commercial-ready solution, you can try the AI Clothing Editor on Imagens.app. It focuses on safe outfit replacement, realistic results, and fast generation.
If your goal is learning how to remove clothes from image using AI without risking your brand or account, start with tools built for professional use and keep results clean, realistic, and compliant.
Table of Contents
Information
- Hits1088
- Published date2026/01/22